Adding & Editing Map Layers
The Map Layers panel provides you with all the tools to add any type of data to the map and modify the way that you visualise it.
At the top of this panel is the  add map layer button. Click here to add a new layer.
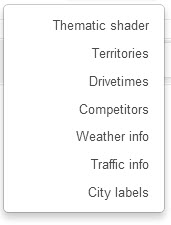
From the menu, select any of the layer types. More information is provided below.
Thematic Layers
These are shade layers, also known as 'hotspot' layers. They show the distribution of data or information by geography, such as postcodes, communes or zipcodes for example.
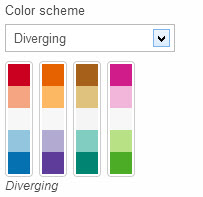
Select thematic shader and then select a potential value to shade on the map. You can import any data at the same level of geography and select it from the dropdown menu. See the video link to understand how you can select different colour schemes and classifications. The colour scheme you select, depends upon the type of data you are trying to show.
Colour scheme
Sequential schemes order data from high to low, accenting the highest as a dark shade and the lowest as a light shade (or vice versa). Sequential schemes are best if you are mapping quantitative data and do not want to focus on one particular range within your data.
Divergent schemes are best at highlighting a particular middle range of quantitative data.. Pick two saturated contrasting colors for the extremes of the data, and the middle ranges blend into a lighter mix of the two. This is particularly great for accenting the mean of your data and exposing locations that significantly ‘diverge’ from the norm.
Qualitative schemes. If you are working with qualitative data, such as ethnicity or religion, you want to pick a series of ‘unrelated’ colors. The trick is to pick a really nice color theme so your map looks great. You can also accent particular aspects of your data by your choice of color. For example, one strong dark color among a group of lighter colors will ‘pop’ out of the map, highlighting that particular facet of your data against all others.
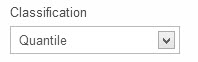
Classification
The classification that you select will change how the data ranges are displayed.
A Quantile classification allows you to see the full range of values on the map, including 'outliers'. This method classifies data into a certain number of categories with an equal number of units in each category. If you have a wide range of data on the map, this is the best way to make sure that you can display it all.
Equal Intervals. This method sets the value ranges in each category equal in size. The entire range of data values (max - min) is divided equally into however many categories have been chosen.
For more information about data classification, click here.
Click on the link below to see the video on adding and editing thematic layers
Territories
You can add an existing territory, either one you have imported or one that is already provided. Alternatively, you can create drivetime friendly territories
Select Territories and then select the option to add either 'select existing' territories or 'create new' territories.
If you create new territories, you can choose a number of available options such as equidistant (this method allocates geography equally to the nearest outlets) and drivetime friendly (this method uses drivetime and also the attractiveness of an oultlet, using the built in gravity model). You can save the new territory to the database by clicking on the 'Save to DB' option.
Once you have added the territory, you can make changes to the opacity (reduce this to zero if you want to show only the territory outline), the outline weight and outline opacity.
Drivetimes
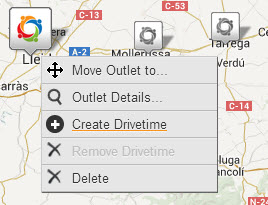
You can create and modify drivetimes for any outlet.
Select an outlet, right click and select 'Create Drivetime'
A new layer will automatically appear in the map layers panel with configuration settings for the drivetime layer that you just created. You can reduce the drivetime or increase it. As you do this, you can see the drivetime change dynamically on the map.
Competitors
You can select any competitor network by brand.
Select 'Competitors' from the list and select the brands you wish to display. There is an option to display all brands.