You can create a study area on the map in order to define which outlets are displayed in the LiveImpact panel. To create a study area, right click on the map on the location where you want the study area to be centered. In the right-click options is the option to 'Create Study Area' - select this option.
In the LiveImpact panel a slider bar
will activate which allows you to select the extent of the study area. As you change the area, you will see the study area change on the map. Drag the bar until you are satisfied that you have selected the outlets required within the study area.
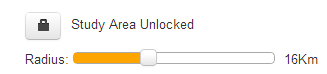
Now you can click on the
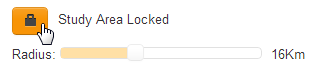
lock button to lock this area. The contents (list of outlets) of the LiveImpact panel will change to reflect area you have selected. To change the study area, first unlock the area by clicking on the lock button again, and then change the study area by dragging the slider bar to a new size.
Please note that the study area simply selects the outlets which appear in the LiveImpact panel. It DOES NOT alter the way in which potentials are calculated for any of the outlets. It DOES NOT change any of the dealer influence settings or the drivetimes used in calculating the potentials for each of the outlets.
You cannot select another potential while this is locked.